Thursday, September 26, 2013

Parenting Transitions


Lately, I've felt myself to be in what I call a "parenting transition".  You know how sometimes you're going along and things seem pretty smooth, pretty simple, and then suddenly nothing you were doing seems to work anymore, and you feel like your family is coming apart at the seams? No, only me?  Well, anyway...

I think it may be due to the start of a new school year and new activities, or maybe it's just plain old GROWING, but we and our kids have felt a bit out of step lately.  (That's a nice way of saying there's been a whole lot of fightin'!)

I decided to go back to some of the parenting books that have stood me in good stead over the years, as well as read some that were new (to me).  

You can see my stack in the photo above.  I thought I'd take a minute to tell you a bit about each one, as much as I can, just in case you find yourself in a parenting transition, either now or in the future.

Do I Get My Allowance Before or After I'm Grounded? by Vanessa Van Petten.  The author of this book calls herself a "youthologist" and is quite young herself.  She writes as someone who is in-between the ages of the teen and the parent.  I've not read the whole book yet, but do like her perspective and her focus on relationship-building.

Seize the Moment, Not Your Teen by Bill Sanders.  I picked this one up because I really like the title.  Too often I get swept away by anger or frustration and lose the opportunity to really connect with my teens.  

Grace Based Parenting by Dr. Tim Kimmel.  I have loved this book so far.  This one is definitely from a Christian perspective.  The author emphasizes a tenderness and a coming-alongside that doesn't come so naturally for me.  I need this point of view.

Youth:  The Years from Ten to Sixteen by Arnold Gesell, Frances Ilg and Louise Bates.  This is a much older book and is no longer in print; the copyright in my book is from 1956.  While much of it is outdated, I like that this book is quite comprehensive and detailed.  I have always found the series by these authors on the different ages to be revelatory; this edition is no different.  Best of all, it cover three of my four children!  There is much to take in here, so I read it in small doses.  It's a good resource book.

The Key to Your Child's Heart by Gary Smalley.  This is a classic from back in the 90s.  I've had this book for years (I think my mother-in-law gave it to me before we had children), but had never read the whole thing.  At first, I found it hard to read because it felt like the author was just describing his perfect family, WHICH I DON'T HAVE. Sometimes I find parenting books unbearable because they hold up an impossible standard that just crushes me.  But as I read further, I saw that the author does NOT have perfect family, and he does have some really good suggestions for creating a close-knit family, and for getting closer to kids who may have shut you out.  I liked this one.

Parenting Teens with Love and Logic by Foster Cline and Jim Fay.  I love anything by the Love and Logic people.  I think their ideas make so much sense and REALLY DO WORK if you can discipline yourself to really try.  This is the kind of parenting book to keep on your bedside table and just read a bit every night.  Because we always need help, we always need reminding. 

So there's my reading list, people!  Tell me, what books of resources have you found helpful?  

Manicure Tips

(This post originally appeared on Four Front Doors.)


I've used many brands of polish, in many price ranges.  My favorites are OPI, Essie, and Deborah Lippmann, but I've also found some drugstore brands I like, such as L'Oreal and Milani.  Most will work as long as you follow these tips.

Store polish in a cool dark place, and just go through your stash and toss out any old and goopy polishes.  Don't try to save them with polish remover.  Just say goodbye and move on.

I'm not a professional by any means, but these are my personal tips that have worked for me.

1.  After removing polish, file nails in one direction only.  Do not file across, as this can give a rough edge to nail tips.
2.  Do NOT soak your nails right before or after a manicure.  You don't want added water here.
3.  (This is my #1 tip:)  Buff nails GENTLY and lightly to remove ridges and give a smooth surface.  Don't do it too much or you could thin the nail.  This step has made a HUGE difference in the staying power of my polish.
4.  Wipe nails with acetone polish remover to prevent residue like water, lotion, or natural oils and to remove any particles left from filing and buffing.
5.  Start with a sticky base coat.  
6.  Use thin coats of polish, and let it dry between coats.
7.  Be sure to cover the free edge of the nail with polish to "seal" the manicure.
8.  Give nails plenty of time to "cure," even if they seem dry.
9.  Use a top coat, and try to do it every day.
10. Use cuticle oil.

This might look like a lot of steps, but once you do it a few times, it really doesn't take long at all.  The best part is that your manicure can last much longer with very little chipping in between, so it's worth it.    Hope this helps your manicure look pretty longer!

Thursday, September 27, 2012

Big Bird Pumpkin

Pumpkins are popping up everywhere lately, as we near Halloween. I remembered the Big Bird pumpkin my daughter and I made a few years ago and thought I'd share. Check it out!


Figuring out how to make it was more difficult than actually making it. So if you want to make one like this, I'll share with you how we did it (finally, after several missteps).

What you need:
pumpkin
yellow paint
BIG googly eyes
Styrofoam cone
hot pink felt
dark blue glitter felt (or navy or black)
yellow felt
light pink felt
red felt
yellow feathers (sold in a little pack at the craft store)
hot glue or some other adhesive
wire hanger
wire cutters
paper and pen (optional)

Paint the whole pumpkin yellow.  It might take a couple of coats to get full coverage. Let it dry.

Make the beak - cut the Styrofoam cone in half lengthwise. Cut the yellow felt to fit, wrapping the ends like a present and gluing everything down as you go.  Then cut out the red felt to fit inside the flat cut edges of the Styrofoam, both sides.  Next cut a light pink tongue to fit inside that (only one, obviously). See photo for example. Glue it all together well.

Place the googly eyes on a piece of paper and draw a circle around them at the size you want the dark outline to be.  Then draw out two semi-circles on the paper for the eyes. This is just so you can have a template for cutting out the felt. It's not 100% necessary, but it made it easier for me.

Next use the circle template to cut out the dark felt and the semi-circle template to cut out the eyelids.
Glue the google eyes onto the dark felt, and glue the eyelids over that, onto the tops of the google eyes. Let them dry, and then glue the whole thing onto the pumpkin.

To attach the beak - Using wire cutters, cut four pieces of wire, 4 or 5 inches each. Attach the beak top and bottom to the pumpkin by skewering the base of the Styrofoam (which won't be covered in felt) and also skewering the pumpkin.  I put them in the foam first, and then kind of held it up to the pumpkin to see where the wires would go in the pumpkin, where I marked dots with a pen.  Then I took the wires out and inserted into the pumpkin and put the beak pieces onto that. That' just because of the texture of the pumpkin being tougher and might need a little more oomph.

You might need to top this off with some glue.  Oh, and don't get cute and think you can do this part with toothpicks. Nope, I'm gonna go out on a limb and say it can't be done. I don't know that for a fact, but I do know that it couldn't be done in my house, so that's my story.

Last thing, get out those feathers and start gluing them to the stem. They'll stand straight up, just like our pal on Sesame Street.  Let it dry overnight.

Then display that bad boy, and watch the Big Bird fans squeal with delight!


Saturday, August 18, 2012

Taste Test

I stumbled upon this Hungry Girl Flat Out flatbread on my last grocery outing.  There were a few other varieties, but I decided to try the traditional white since I had already purchased our grainy breads earlier in the week.

Actual flatbread on a salad plate
The size is not huge, but it's good for a sandwich or baked pizza.  The taste was good.  The thing that impressed me most was that the texture was smooth and wasn't gritty like some "light" white bread products can be.  These were flat yet somewhat fluffy - like a combination between a flour tortilla and a slice of white bread.  Very good!

I have not been compensated in any way for this review, and I purchased the item myself.


Friday, August 17, 2012

Family Night Pasta Bake


I have seen versions of this dish all over the place, and this is my take on it.


Family Night Pasta Bake

1 pound Italian sausage
1 box penne pasta
1 (15 oz.) jar Alfredo sauce
1 (24 oz.) jar Marinara sauce
2 cups shredded mozzarella cheese
1 cup shaved parmesan cheese
Red pepper flakes (optional)

 Preheat oven to 350 degrees.

 Cook sausage until cooked through. Drain and set aside.

 Cook pasta according to directions and drain.

 In a large bowl, mix cooked sausage, both sauces and the mozzarella cheese. Stir to combine. Add red pepper flakes to suit your taste (optional). Add cooked pasta and mix thoroughly.

 Pour mixture into 9 x 13 baking dish and bake at 350 for 20 minutes.

 Remove from oven and top with shaved parmesan cheese.  Bake for an additional 5 minutes.  (Grated parmesan can be substituted, but shaved gives a nice melty texture.)

Serve with garlic bread and a salad, and you're all set.  So simple and tasty!


Sunday, July 1, 2012

Easy Quinoa & Mixed Grain Salad


I've only recently discovered quinoa (pronounced "KEEN-wah," by the way).  I had heard about quinoa before, but hadn't tried it until a friend served it at a dinner about a year ago.  I was surprised by how much I liked it.  I'd read all about how good quinoa is for you, but frankly I was a little bit intimidated when it came to actually preparing it myself.

If you're a newcomer to quinoa, never fear!  It is so easy to make.  If you can cook rice, you can cook quinoa!

Here is a recipe I've come up with (tweaked from others I've come across), and it's really good.  There is a secret to this dish...It's great hot, but it's AMAZING cold, after sitting for a few hours in the fridge.

Here's what you need and what you do:

Easy Quinoa & Mixed Grain Salad

INGREDIENTS

  • 2 cups cooked mixed grains (I used a cup of quinoa and a cup of 5-grain mix of Italian farro, barley, brown rice, kamut wheat & oats).
  • 1/2 red onion, diced
  • 1 bell pepper, diced (I used a yellow pepper)
  • 1/2 cup finely chopped herbs (I used cilantro, but you can also use dill, parsley, and/or chives)
  • 1 to 2 tablespoons extra virgin olive oil
  • Juice from 1 lime (I didn't have a fresh lime on hand, so I used about 2 tablespoons prepared lime juice)
  • Coarse salt
  • Ground pepper
  • Garlic powder (optional)
  • Season-all (optional)


DIRECTIONS

Prepare mixed grains according to directions.

In medium bowl, toss 2 cups cooked grains with 1/2 red onion, one bell pepper, and 1/2 cup finely chopped fresh herbs.  Add 1-2 TBSP extra virgin olive oil and lime juice, and mix.  

Season with coarse salt and ground pepper, to taste.  I also added a few sprinkles of garlic powder and season-all at the end, to give a little extra flavor.

As I mentioned earlier, this dish can be served warm, right after preparing, BUT the magic is in the waiting.  If you refrigerate this for a few hours or overnight, the flavors will blend into unexpected yumminess!  My family likes this hot or cold.  It works either way!
I served this with pork chops and seasoned green beans for this meal, but it also works as an alternative to rice with Mexican food.  Enjoy!

Monday, June 18, 2012

Easy Chicken Tortilla Bake

I saw a recipe for Easy Chicken Tortilla Bake here and thought it looked pretty easy and tasty, so I tried it.  This was one of the easiest recipes I've ever made, and the entire family (including my picky daughter) all liked it.  You make it in an 8x8 dish, but it goes all the way to the top, so it's a lot of food!


Here's the recipe:

Easy Chicken Tortilla Bake

3 cups cooked chicken, diced 
1 (16 oz) jar Pace Salsa Verde (I couldn't find Pace and just used another brand)
1 cup sour cream plus additional for topping, if desired (could also use reduced-fat)
5 (6-inch) corn tortillas (I used white corn tortillas)
2 cups shredded cheese  (I used a 2% Mexican blend)
Diced jalapeno peppers, optional (I used canned)

Preheat oven to 375 degrees. Spray an 8X8 casserole dish with cooking spray.

Cut or tear tortillas into smaller pieces.
Spread half the chicken on the bottom of the casserole dish, top with half of the salsa verde, then half of the sour cream, half of the tortilla strips, then half of the shredded cheese. Repeat layers. 


Cover dish with aluminum foil and baked in preheated oven for 40 minutes. 


Uncover and bake for 10 more minutes, until bubbly. 


Let cool for 15 minutes before serving.

Top with jalapeños and/or more sour cream if desired. (I desired.)

I served this with a side of zucchini, yellow squash, and onions, topped with black pepper and a little season salt.


So yummy!

Sunday, June 10, 2012

Doubling Frosting

I read here that you can whip up your store-bought frosting and it will double in just a short time.

I was skeptical but just had to try it.

I started with a Creamy Supreme Classic White frosting from Pillsbury.


Here it is in the bowl before I whipped it:

And after:
Not sure it quite DOUBLED, but it did increase in volume.  I did notice at the grocery store that the same size can of frosting for the whipped version weighed less than the non-whipped version, though not half as much.  So that tells me that this is a legit tip, in theory.  My only thought is that it isn't doubled, but it is increased (in my experiment anyway).  Obviously if you're adding air to it, it's going to fill it out.  Good tip!


Thursday, June 7, 2012

Pinterest Lesson for Mom - Part 1

Lesson 1 - Getting Your Head Around What Pinterest Is

This is for my mom, who has a Pinterest account but ZERO boards and ZERO posts.

I want you to know how fun it is to pin away, so I'm going to give you a little crash course for beginners. Nothing fancy yet.  Nothing scary.  I just want to explain it to you in my own way.

The first lesson is very simple -- Get your head around how Pinterest works and what it is.  Mom (and several other non-pinners I've spoken with) have said they "don't get Pinterest" and just don't understand what it is.

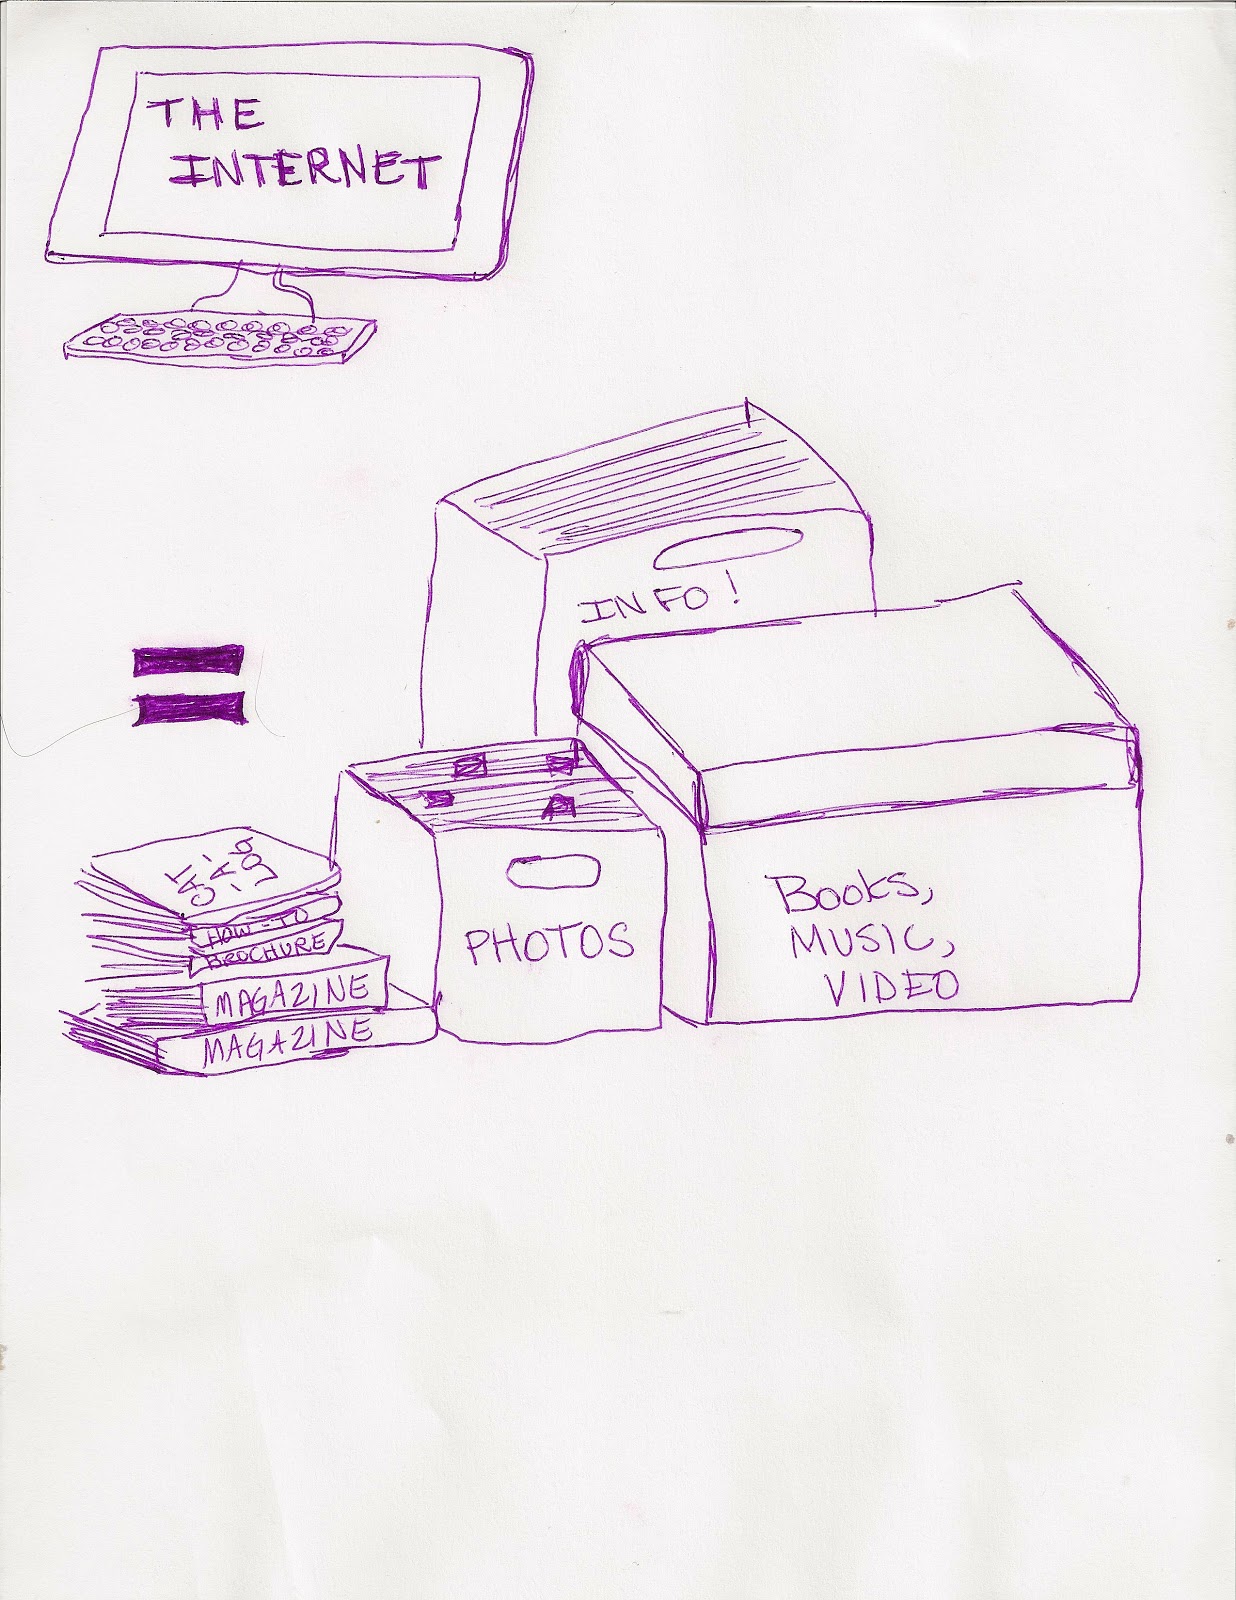
Imagine the entire internet is a huge stack of magazines, books, photographs, catalogs, brochures, etc.


Now imagine that Pinterest is a big blank wall in your house.  You have a bunch of bulletin boards on the wall for different categories.  (These are, you guessed it, your BOARDS.)  You can name these boards things like "Crafts," "Recipes," "Gifts to Buy My Daughter," etc.

If you see something you like on the internet, you just tear out the page (or picture or some words) so you can go back to it later.  (That's a PIN.)  You're going to take that picture you tore off the "paper internet" and assign it to any board you want.  (That's PINNING.)


The cool thing is this.  Let's say you wanted to keep a really long article you saw online about the joys of having an amazing daughter.  Seriously, you should do that.  Anyway, suppose the article is really long, and it wouldn't be convenient to tear out the whole article and all its accompanying photos.  So you just take one photo from the article to remind you what the article is about.  You pin that, and Pinterest will automatically link it with the article.  You can add your own description if you want to.  Then later you can go to your boards, click on that picture, and it will take you to the site where you first found it.

Easy, right?

Next lesson coming soon!


Stuart

Just a good ol' boy!

Wednesday, June 6, 2012

Crawly Experiment for Kids


It's easy to see which ants have been sipping which coloured sugar water drops thanks to their transparent abdomens. Father of three Mohamed Babu set up these photographs after his wife, Shameem, showed him some ants that had turned white after sipping on some spilt milk. Dr Babu mixed sugar water with edible colours red, green, blue and yellow and placed them in his garden to attract the insects. He discovered the ants preferred lighter colours such as yellow and green...
Photo Source: The Telegraph

I ran across this photo at The Telegraph and was inspired to do a little experiment with my little guy.  Those look like huge colorful globs, but they're really just colored sugar water drops on a paper plate.  (We used red, yellow, green and purple.)

We didn't have this many ants, which was bad for the experiment but good for our backyard.  The original text with this photo said they found the ants preferred yellow and green.  Ours seemed to go for the red, but really they tended to just go for whichever color they came upon first.  We watched for a long time to be sure.

Also, I didn't think the little solid black ants in our yard would look like those in this photo.  However, after they drank for awhile, they did get big ol' bellies that went transparent like in the photo above, and you could easily see the different colors in them depending upon which drop they were drinking from!

While I'm not normally crazy about ants, the little guy and I had a lot of fun with this experiment, and he talked about it a lot.


Tuesday, June 5, 2012

Yarn Wreaths

I've been seeing lots of yarn wreaths around the internet lately.  I found these that I thought were crazy cute.  These first few are ones available to purchase, and the last few are tutorials for how to make your own.

Cakoons on Etsy uses great colors and interesting textures on these wreaths available for purchase.

Yarn Wreath with Felt Flower-  10in- Gerbera Gertie (v. Rainbow)


Yarn and Felt Flower Wreath- 10in- Retro Ruth Jr.


ItzFitz on Etsy uses a simple color for the body of the wreath with rich colors in the felt flowers attached.  Available for purchase.

Pinned Image

HOW TO MAKE YARN WREATHS


Danielle Burkleo gives a step-by-step tutorial for creating these wreaths and the felt flowers attached to them.

Photobucket

Photobucket


For another take on the yarn wreath, Michele at The Scrap Shoppe Blog shows you how to make this cute yarn wreath with flowers and a monogram.


Now go get some yarn, and start wrapping those wreaths!

Monday, June 4, 2012

Journal Gifts


This year I had a total of 15 (yes, 15) teacher gifts to give.  With all those teachers, you might think I have a whole mess of kids.  You'd be right, if you think two kids = a whole mess of kids.  I just didn't want to leave anyone out.  I also didn't want to spend my usual $25-30 per teacher this year, since I'd like to keep my husband's head from exploding when he gets the bank statement.  So I came up with something I thought was pretty cute instead.

First I printed out guided journal pages I found at Grace is Overrated. They're free to print, and they're all so cute and insightful. Since I had so many to make, I took them to be copied at the local office supply store.


You can print them with or without the borders, and with or without the color.  I chose borders with no color so they'd be pretty and the recipient can color them in if they like.

I included this birthday page.


This was followed by a couple of blank pages of card stock for photographs (or whatever).

(I have since found this Day in the Life page and regret that I didn't include it in my gifts, but if I do this project again, this will go in too.)


Each section began with a blank sheet of card stock.

The first batch I made, I had them spiral bound at said office supply store.
The second batch I did, I used the Zutter Bind-it-All and did it myself.

After they were bound, I printed out the words "Journal," "Birthday," and "Photographs."  I cut them out and adhered them to each dividing sheet of card stock.  Then it was time to decorate the covers.  Since I used solid colors for the covers, I just kind of winged it with the decorations.  I cut out a coordinating paper to fit as a stripe along the side.  I inked the edges of the paper, and adhered it to the cover.  Then I added an embellishment or two, wrapped them up, and gave them out!


These would be great for teacher's gifts, a little extra for yourself, stocking stuffers, or just-because gifts for a friend or family member.  Have fun!

Tuesday, May 22, 2012

Moroccan-Inspired Painted Jar Lantern DIY


Since I had finally tinted a jar (See tinting tutorial here), I needed to do something with it.  I ran across a photo I liked on Pinterest.  This was my inspiration, a lovely moroccan-inspired painted jar lantern for sale on Etsy by Lit Decor.  Since this would be my first time trying this (and since it was an item for sale with no instructions), I knew I'd need to start with a much simpler design.  This one is so lovely though.
Hand Painted Mason Jar Lantern, Goldenrod Tinted Glass with Black Accents


Time to make my own lantern.  Here's what I did.

First, gather the supplies.
- Tinted jar
- Metallic puffy paint
- Transparent tape (optional)
- Dry-erase marker (optional)
- Pencil and paper (optional)

At this point I skipped ahead and wired the jar for hanging.  If I do this again, I'll do this step AFTER I finish decorating the jar.

If you want to draw out a pattern beforehand, do that at this point.

You can use the tape to guide you in making straight lines.  I used the dry-erase marker to draw along the edges of the tape for straight lines.  Next time I'd probably not use the marker, but it's up to you.  It comes off easily, so if you do it and don't like it, no big deal.


I also added some large dots to places where the design would peak, so I could keep them somewhat even.

Then I got started with the painting.  Just gently squeeze the bottle and lift away to form little dots with peaks.  Follow the lines if you have them.  Any mistakes can be cleared away with a Q-tip as you go along.


As the design starts to fill the surface of the jar, it gets easier and easier to smear.  Occasionally through the process I dried it with a hairdryer set on low/cool, just to help with that problem a little.

After I finished the painting, I finished off the wiring for hanging, and let it dry.  All done, and pop a votive candle in, and enjoy!

Here's the finished project.